The first time I had kombucha, I thought it was interesting.
Tangy. Fizzy. A little funky. Different from anything else I was drinking at the time.
But what really made me love kombucha was not just the drink itself. It was the fact that you could flavor it. Once I realized I could take that fermented tea and turn it into something tropical, spicy, fruity, creamy, or almost soda-like, that is when kombucha became exciting.
That is still my favorite part.
Homemade kombucha gives you a simple base, but the second fermentation is where the personality comes in. You can add fruit, ginger, vanilla, herbs, jam, juice, citrus, or whatever direction you want to take it.
But here is the thing I have learned: not every flavor comes through well after second fermentation.
Some flavors sound good in theory but disappear after a few days in the bottle. Some taste muddy. Some are too subtle. Some just do not hold up against the natural tang of the kombucha.
The four flavors I come back to are the ones that actually taste like what they are supposed to taste like.
Fresh guava.
Fresh ginger.
Strawberry with a little strawberry jam.
Vanilla cream soda.
These are my favorite homemade kombucha flavors because they are simple, bold, and easy to recognize after the second fermentation. They do not just lightly perfume the kombucha. You can actually taste them.
And once you understand the basic process, you can keep this going again and again.
Homemade kombucha fits perfectly into the way I think about pantry essentials. A good pantry is not just rice, flour, beans, and pasta. It is also the sauces, condiments, pickles, syrups, fermented things, and make ahead staples that make everyday food and drinks more interesting.
This is one of those staples.
It lives in the background, but it makes your kitchen feel a little more alive.
What is kombucha?
Kombucha is fermented sweet tea.
You start with brewed tea, sugar, starter tea, and a SCOBY. SCOBY stands for symbiotic culture of bacteria and yeast. It is the living culture that helps ferment the sweet tea and turn it into kombucha.
During the first fermentation, the sweet tea slowly becomes tangy, lightly acidic, and less sweet. After that, you can drink it plain, or you can bottle it with flavorings for a second fermentation.
The second fermentation is where the kombucha becomes more flavorful and naturally fizzy.
That is also where these four flavors come in.
Why this homemade kombucha method works
This is a simple 1 gallon kombucha method.
You brew tea with filtered water, tea bags, and sugar. Once it cools completely, you add starter tea and a SCOBY. Then you let it ferment at room temperature until it tastes tangy and balanced.
After that, you save some of the kombucha as starter tea for your next batch, bottle the rest with flavorings, and start the whole cycle again.
That is the beauty of homemade kombucha.
You are not making one batch and stopping. You are creating a rhythm.
Brew sweet tea.
Cool it completely.
Add starter tea and SCOBY.
Ferment.
Save starter for the next batch.
Bottle the rest with flavor.
Repeat.
Once you get comfortable with the cycle, it becomes very easy.
It reminds me a lot of the Pantry First Method. Once you have a simple system, you do not have to start from scratch every time. You just keep building from what you already have.
What you need to make kombucha at home
For one 1 gallon batch, you need:
1 gallon filtered water
8 to 9 black tea bags, or a mix of black and green tea
1 cup sugar
1 SCOBY
1 to 2 cups starter tea from a previous batch of plain kombucha
A large clean glass jar
A clean cloth, coffee filter, or tightly woven towel
A rubber band
Swing top fermentation bottles
A funnel
A fine sieve
The starter tea is important. This is the strong, plain kombucha liquid from a previous batch. It helps acidify the new batch and gets the fermentation going.
For a 1 gallon batch, I like saving about 2 cups of starter tea.
Best temperature for brewing kombucha
Kombucha likes a warm room-temperature environment.
A good target range is about 70 to 80°F. It can still ferment outside that range, but that is the zone where it usually feels the most predictable.
I personally find kombucha to be more forgiving with warmth than cold. I live in Florida, and I have had batches sit in very warm conditions and still produce kombucha. I am not saying you should leave your jar baking in direct sun or pour hot tea onto your SCOBY, but in real life, I worry more about kombucha getting too cold than a little warm.
Cold slows everything down.
When the tea is too cold, fermentation can stall. The kombucha may sit there without becoming acidic quickly enough, and that is when things can get weird. A slow, weak ferment is more likely to make you nervous because it is not developing that clean, tangy kombucha smell and taste.
Heat has a different risk. If you pour hot tea directly onto the SCOBY, you can damage or kill it. So the biggest heat rule is simple:
Always let the sweet tea cool completely before adding the SCOBY and starter tea.
Warm room? Usually okay.
Hot tea directly on the SCOBY? Not okay.
Direct hot sun? I would avoid it.
What if my kombucha gets moldy?
If your kombucha grows mold, throw it away.
Do not scrape the mold off.
Do not try to save the SCOBY.
Do not bottle the liquid.
Do not use it as starter tea.
Mold usually looks fuzzy, dry, powdery, or raised. It may be blue, green, gray, black, brown, or white and fuzzy.
A new SCOBY forming on top can look strange when you are new to kombucha, but it should look wet, smooth, creamy, tan, or jelly-like. Mold looks dry and fuzzy.
When in doubt, do not risk it. Get rid of the batch, wash everything well, and start again with a healthy SCOBY and strong starter tea.

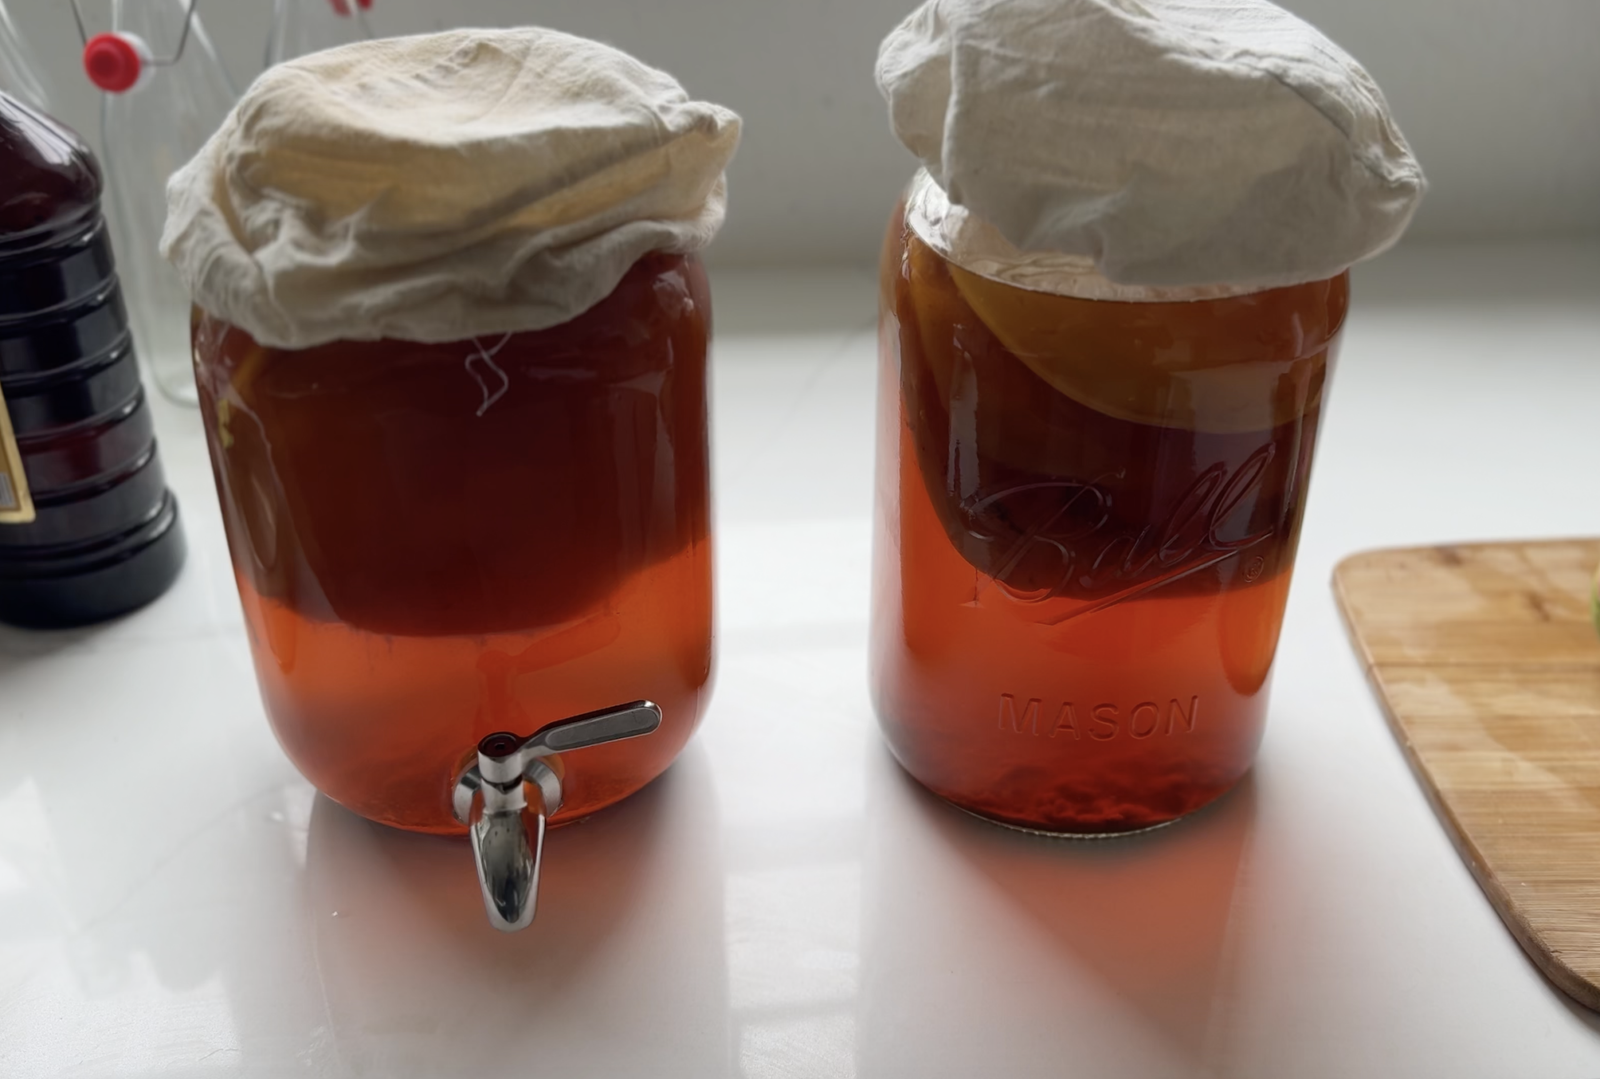
How to make the first fermentation
Start with 1 gallon of filtered water.
You can heat the full gallon, or heat part of the water and use the rest to help cool the tea faster.
Add 8 to 9 tea bags and steep until the tea is strong. Black tea is the easiest place to start because the SCOBY does well with it. A mix of black and green tea also works.
Remove the tea bags, then stir in 1 cup of sugar while the tea is still hot. Stir until the sugar dissolves completely.
Let the sweet tea cool all the way to room temperature.
This is important. Do not add the SCOBY to warm or hot tea.
Once the tea is cool, pour it into a clean glass jar. Add 1 to 2 cups of starter tea and the SCOBY.
Cover the jar with a clean cloth, coffee filter, or tightly woven towel, then secure it with a rubber band.
Let the kombucha ferment at room temperature, out of direct sunlight, for about 7 to 14 days.
Start tasting around day 7.
If it tastes like sweet tea, it needs more time.
If it tastes tangy, lightly sweet, and refreshing, it is ready.
If it tastes very sour and vinegary, it has gone longer than you may prefer for drinking, but it can still be useful as strong starter tea for the next batch.
How to repeat the kombucha cycle
Once the first fermentation tastes ready, remove the SCOBY with clean hands or clean utensils and place it into a clean bowl or jar.
Then save about 2 cups of plain kombucha from the batch. This becomes the starter tea for your next gallon.
After that, bottle the rest for second fermentation.
Then you brew another gallon of sweet tea, cool it completely, add the saved starter tea and SCOBY, cover it, and start again.
That is the whole rhythm.
This is why I love kombucha as a homemade staple. Once it is going, you can keep repeating the cycle with very little effort.
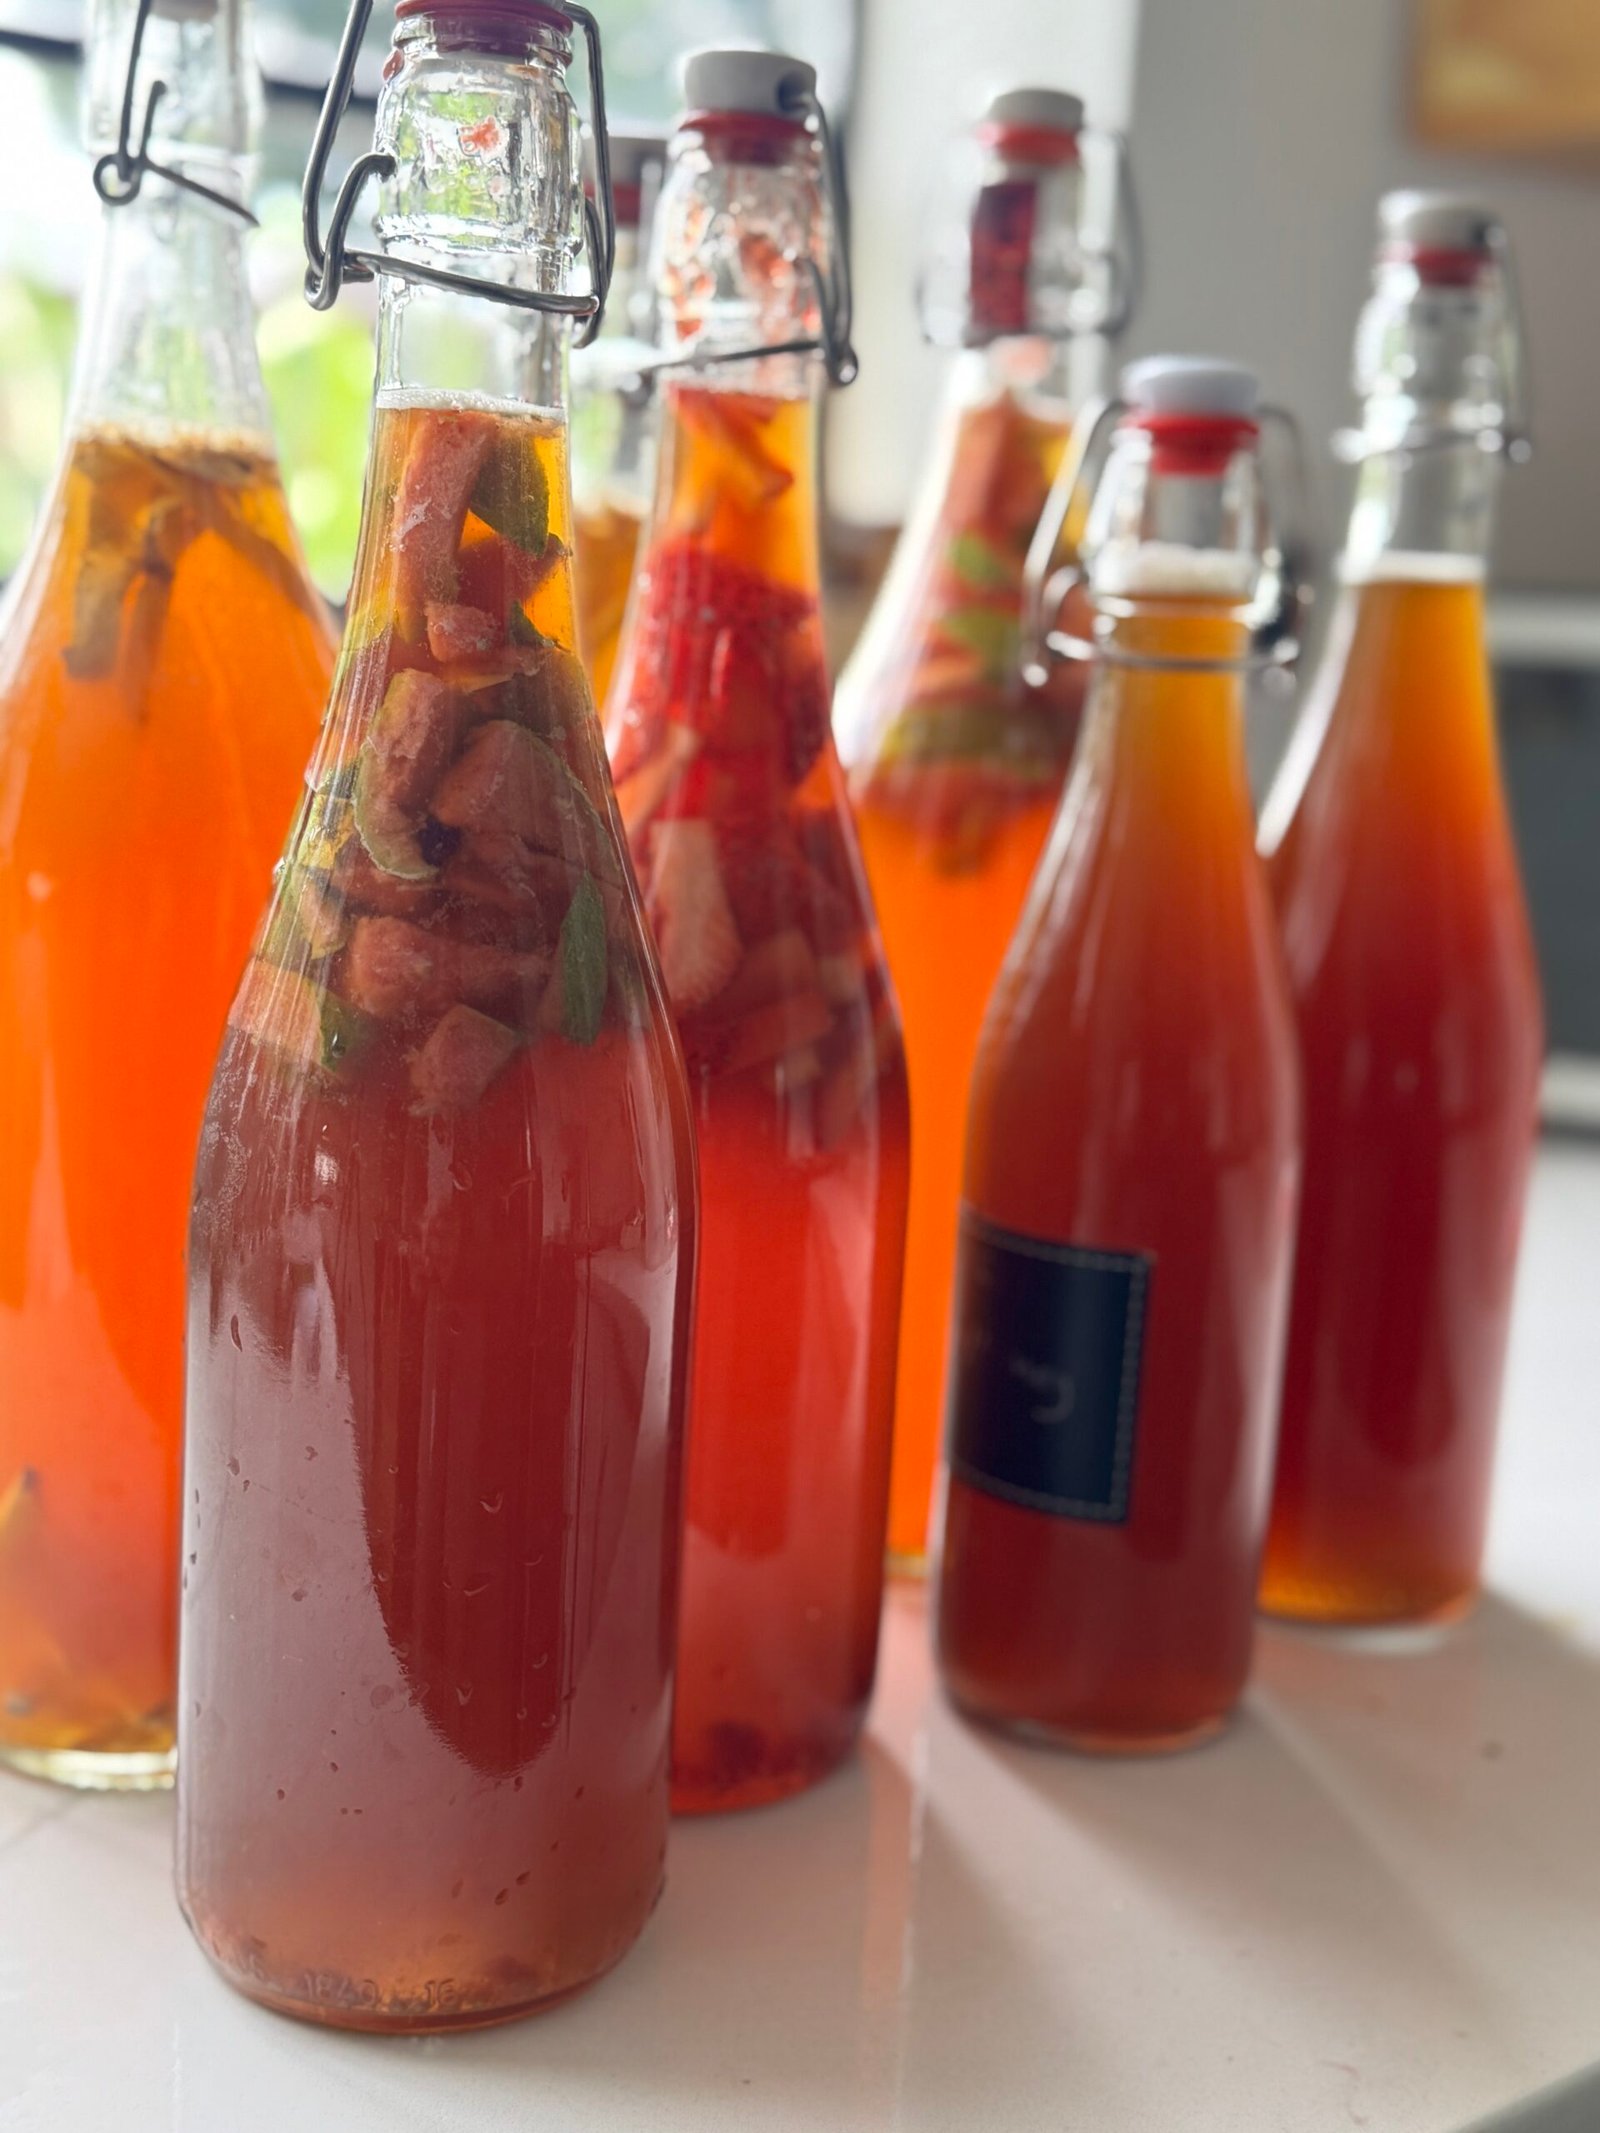
What is second fermentation?
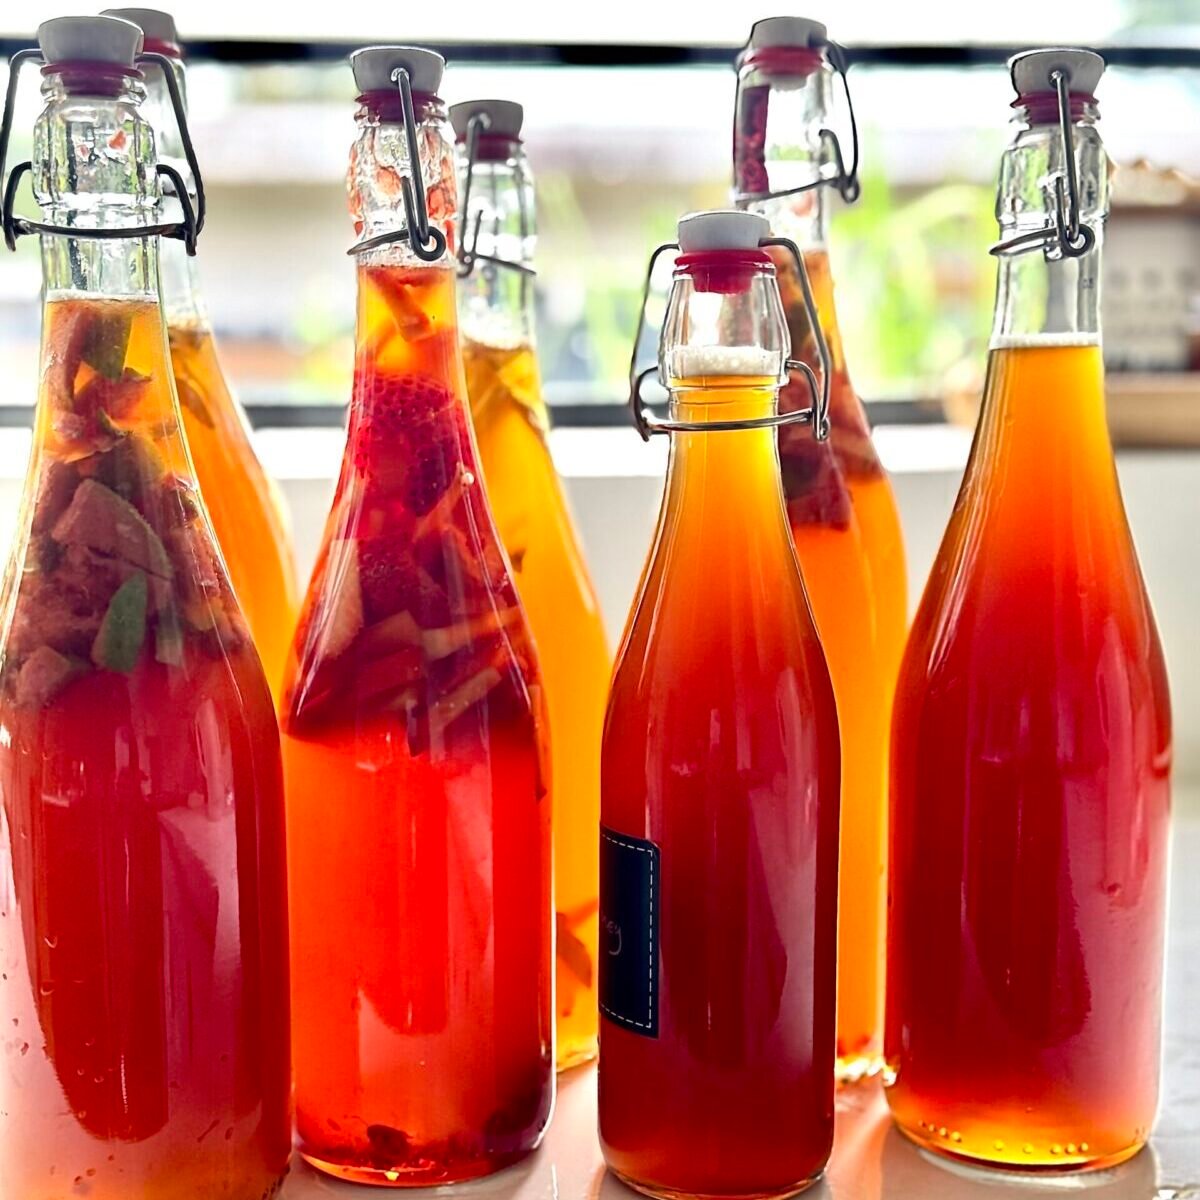
Second fermentation is when you take finished plain kombucha and bottle it with flavorings.
This is where the kombucha gets more flavor and more fizz.
Fruit, jam, ginger, sugar, or vanilla add flavor and can help feed the natural yeast in the bottle. Since the bottle is sealed, carbonation builds.
This is also where you get to make kombucha taste like something specific.
But again, not every flavor works equally well.
Some flavors get lost.
These four do not.
How to bottle kombucha for second fermentation
After you remove the SCOBY and save starter tea for the next batch, gently stir the remaining kombucha.
This helps distribute the yeast so your bottles carbonate more evenly.
If you want a cleaner finished drink, pour the kombucha through a fine sieve as you bottle it. This catches extra SCOBY bits or sediment so the flavored bottles feel smoother.
Add your flavorings to each bottle first. Then pour in the kombucha using a funnel.
Leave about 1 to 1 ½ inches of space at the top.
Seal the bottles and let them sit at room temperature for 2 to 4 days.
Burp the bottles daily, especially when using fruit or jam. Open them slowly over the sink, ideally with a towel over the top.
Once the bottles are fizzy and flavorful, move them to the refrigerator.
Chilling slows the fermentation and makes them easier to open.
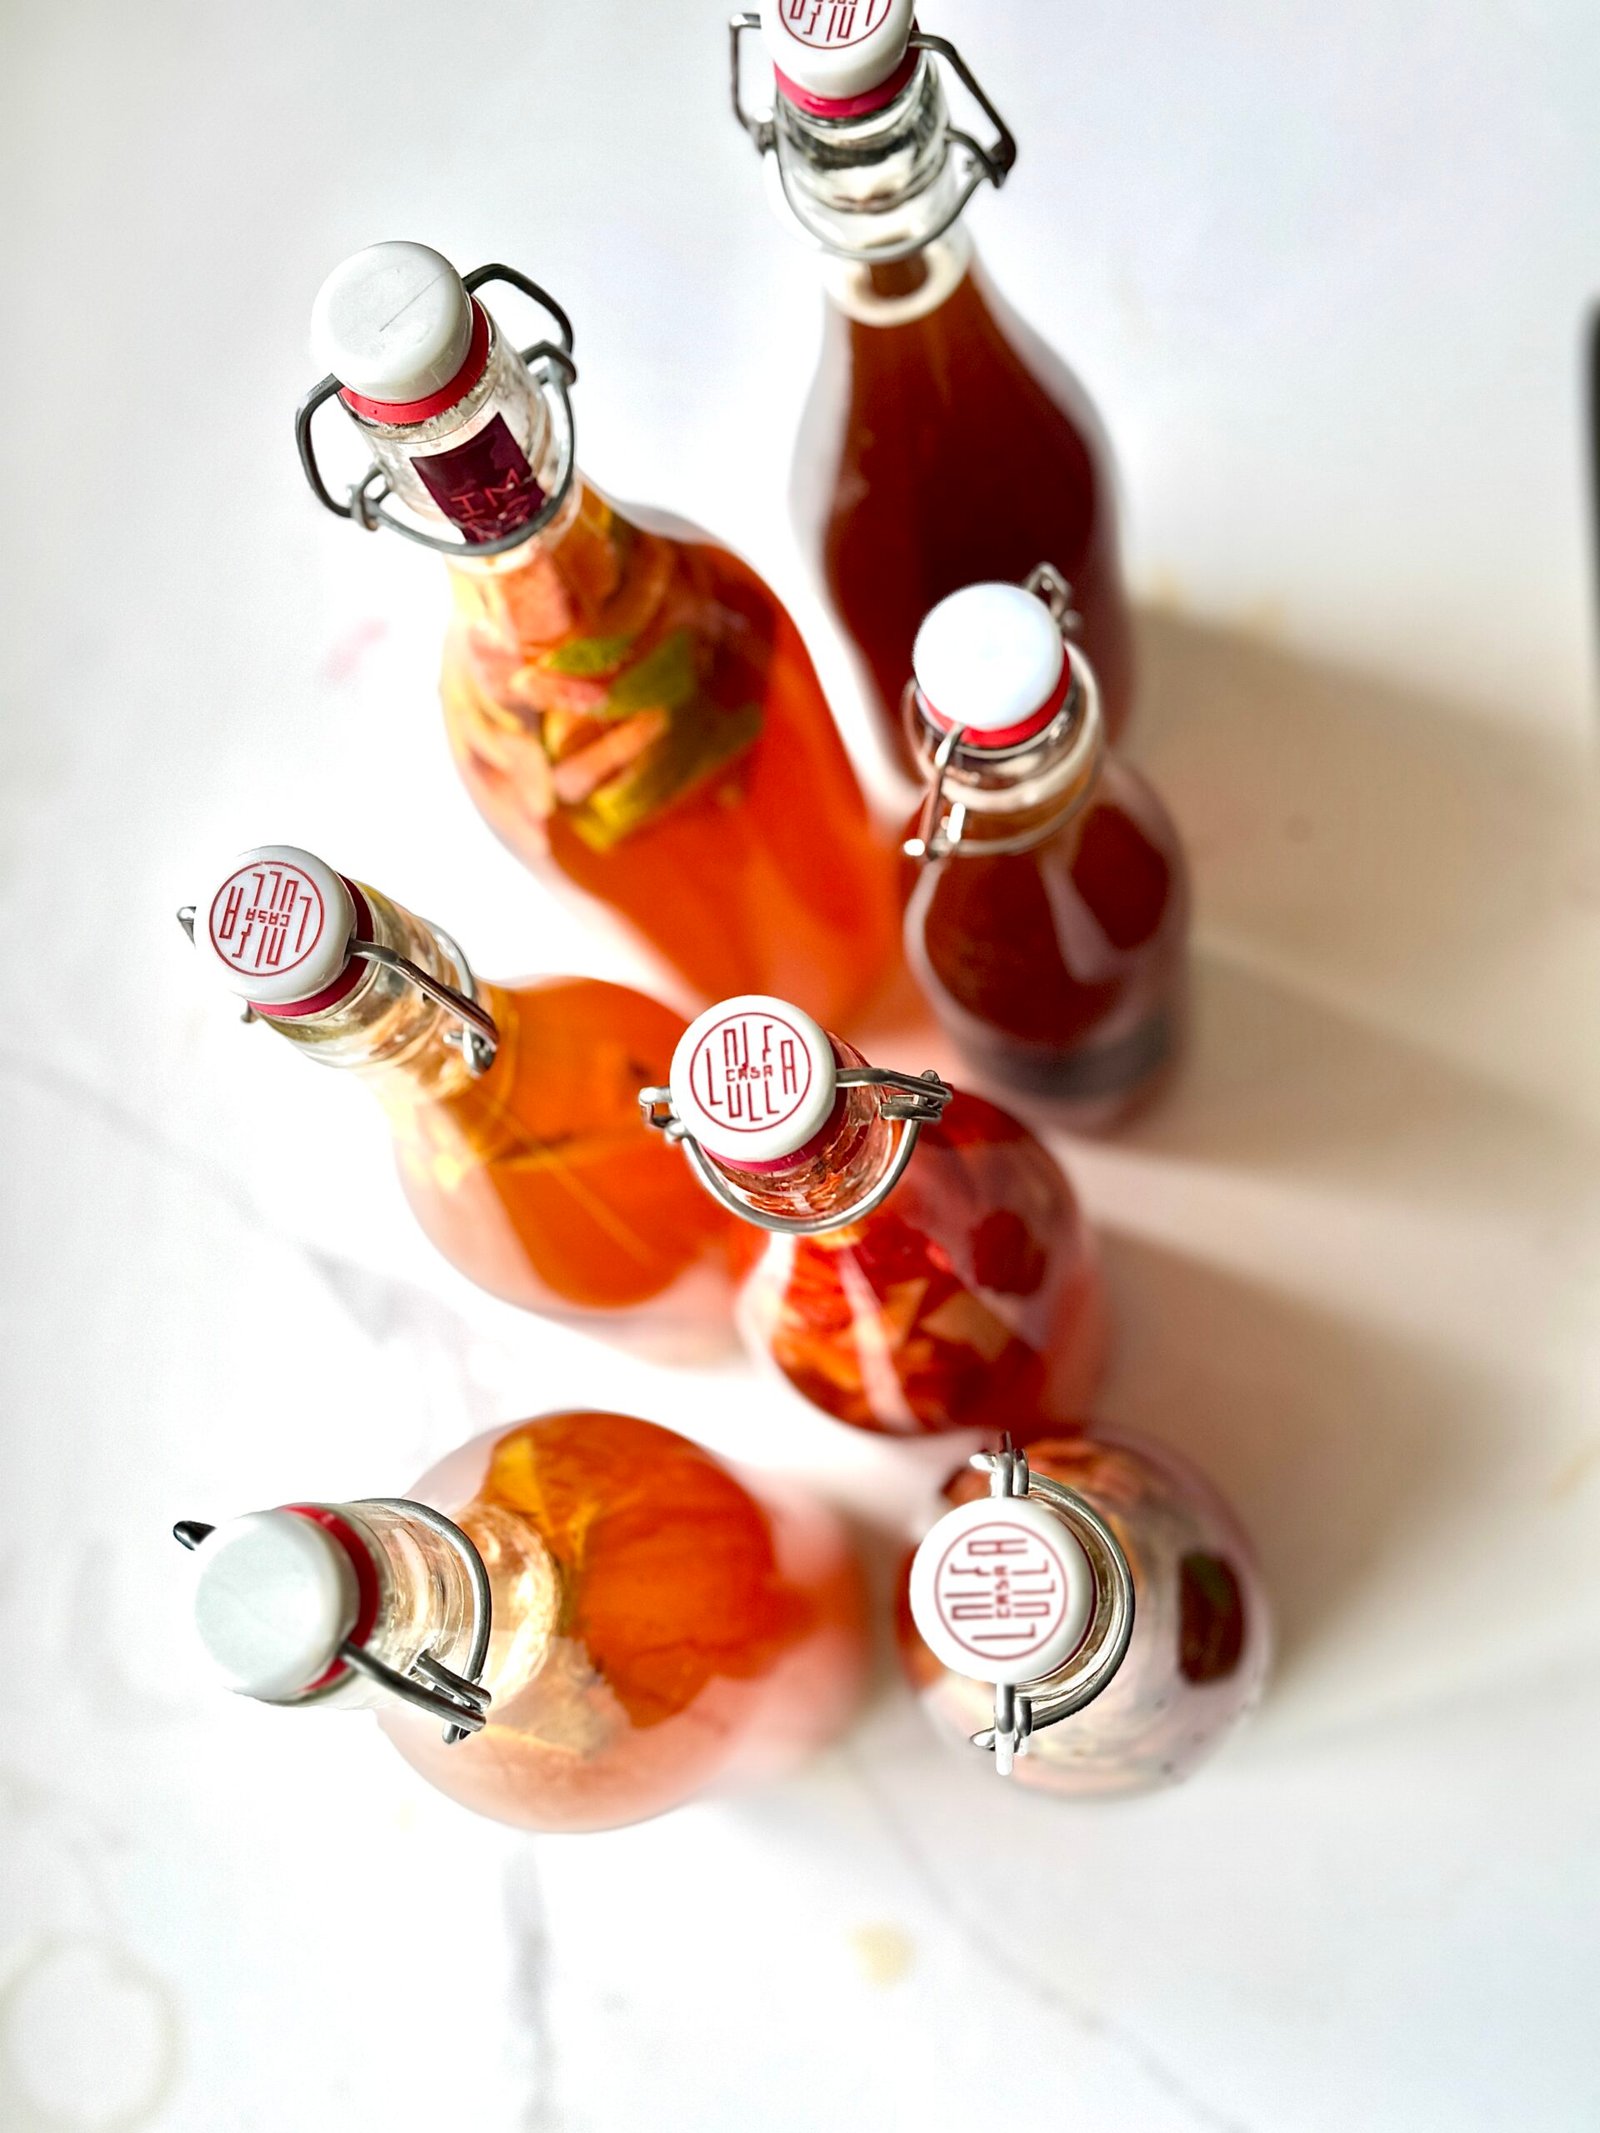
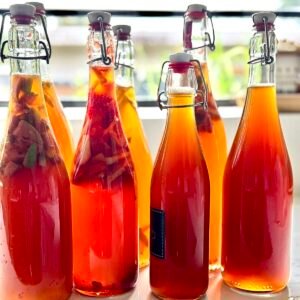
My 4 best kombucha flavors for second fermentation
These are the four flavors I make most often.
There are endless kombucha flavor combinations, and I will give you a few more ideas below, but these are the ones I think come through the best after second fermentation.
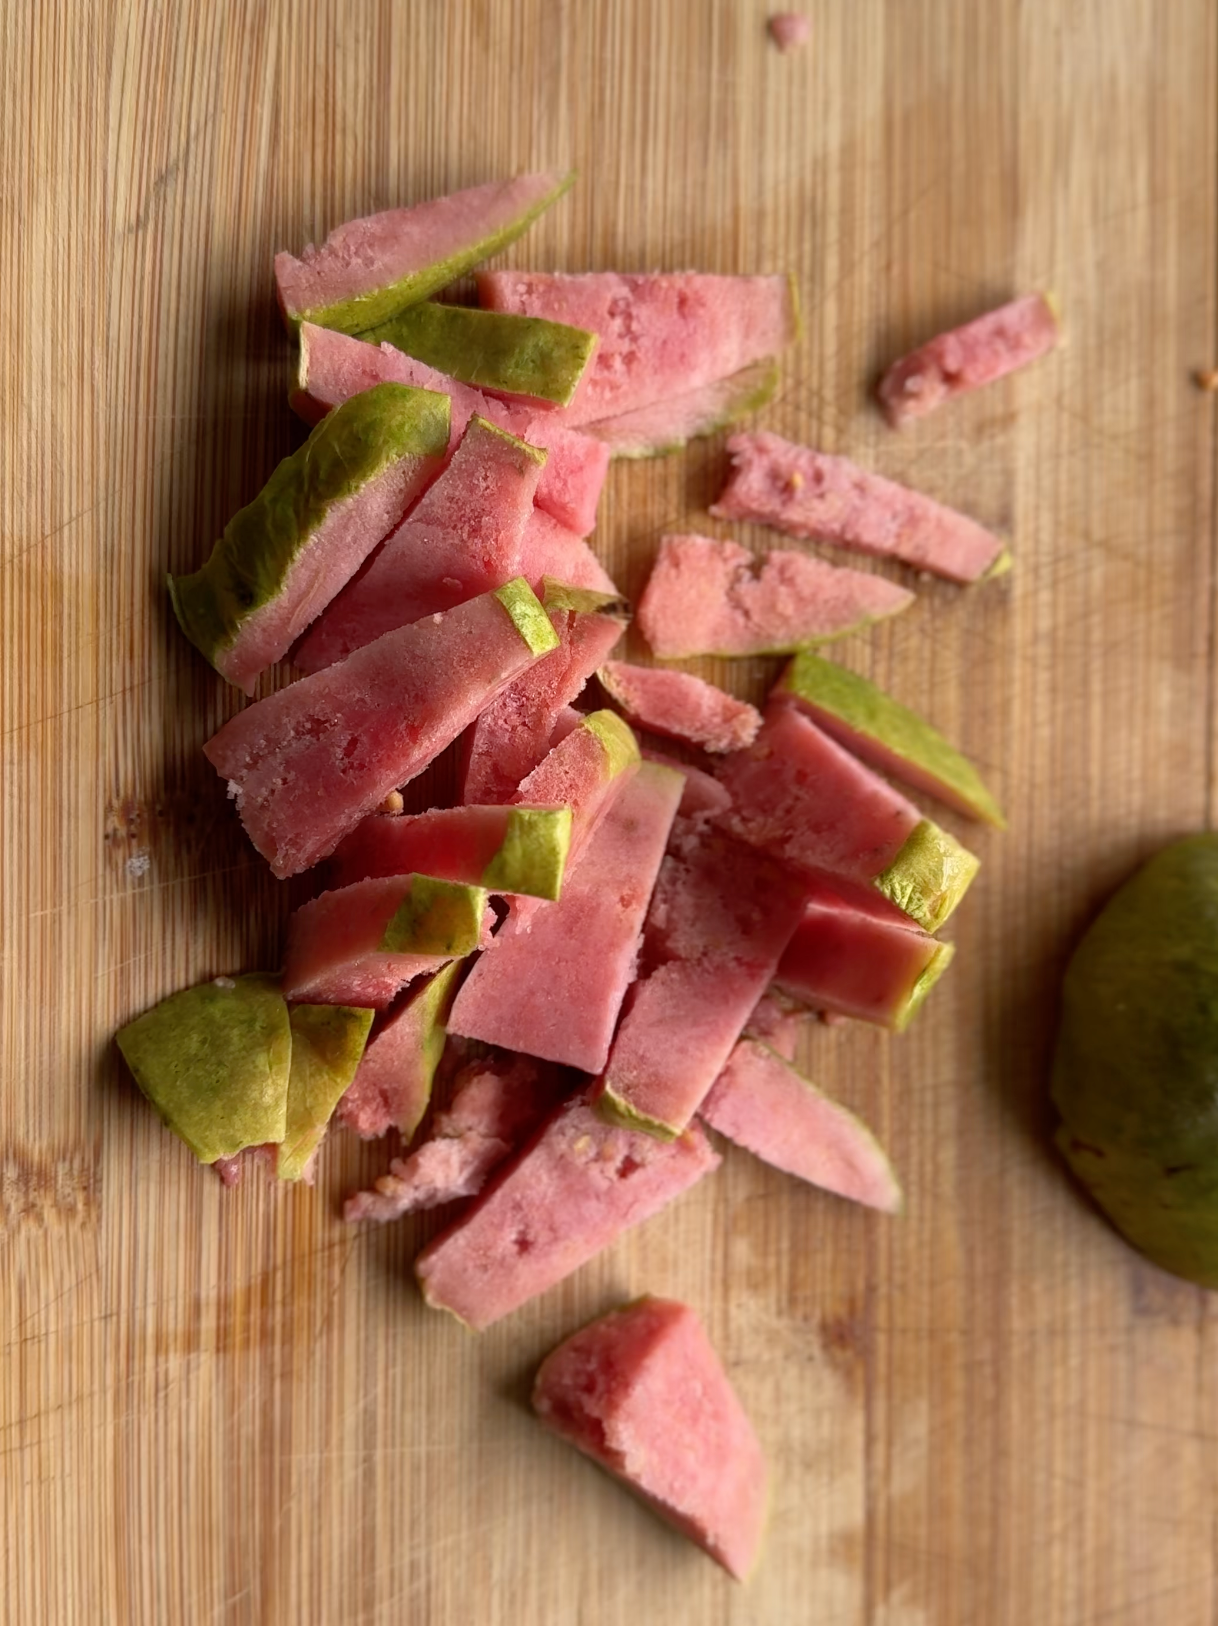
1. Fresh Guava Kombucha
Fresh guava is probably my favorite kombucha flavor.
It is tropical, fragrant, bright, and just bold enough to stand up to the tang of the kombucha. A lot of fruit flavors can fade into the background, but guava does not. It gives the kombucha a gorgeous color and a flavor that tastes like something you would buy in a glass bottle from a specialty shop.
For each 16 ounce bottle, use:
2 to 3 tablespoons chopped ripe guava
Plain finished kombucha to fill the bottle
Add the chopped guava to the bottle, then pour the kombucha over it. Seal and ferment for 2 to 4 days at room temperature.
Once it is fizzy, refrigerate it.
Strain before drinking if you want a smoother kombucha.
If you are only making one flavor from this post, make the guava.
2. Ginger Kombucha
Ginger kombucha is the classic.
It is clean, spicy, refreshing, and very easy to love. Ginger also holds up extremely well during second fermentation. You can actually taste it, and it gives the kombucha that sharp, lively finish that makes it feel extra refreshing.
For each 16 ounce bottle, use:
3 to 5 thin slices fresh ginger
Plain finished kombucha to fill the bottle
For a stronger ginger flavor, grate the ginger instead of slicing it. Just know that grated ginger will create more little pieces in the bottle, so you may want to strain it before serving.
This is the kombucha I want cold in the fridge after dinner.
It is simple, but it works every time.

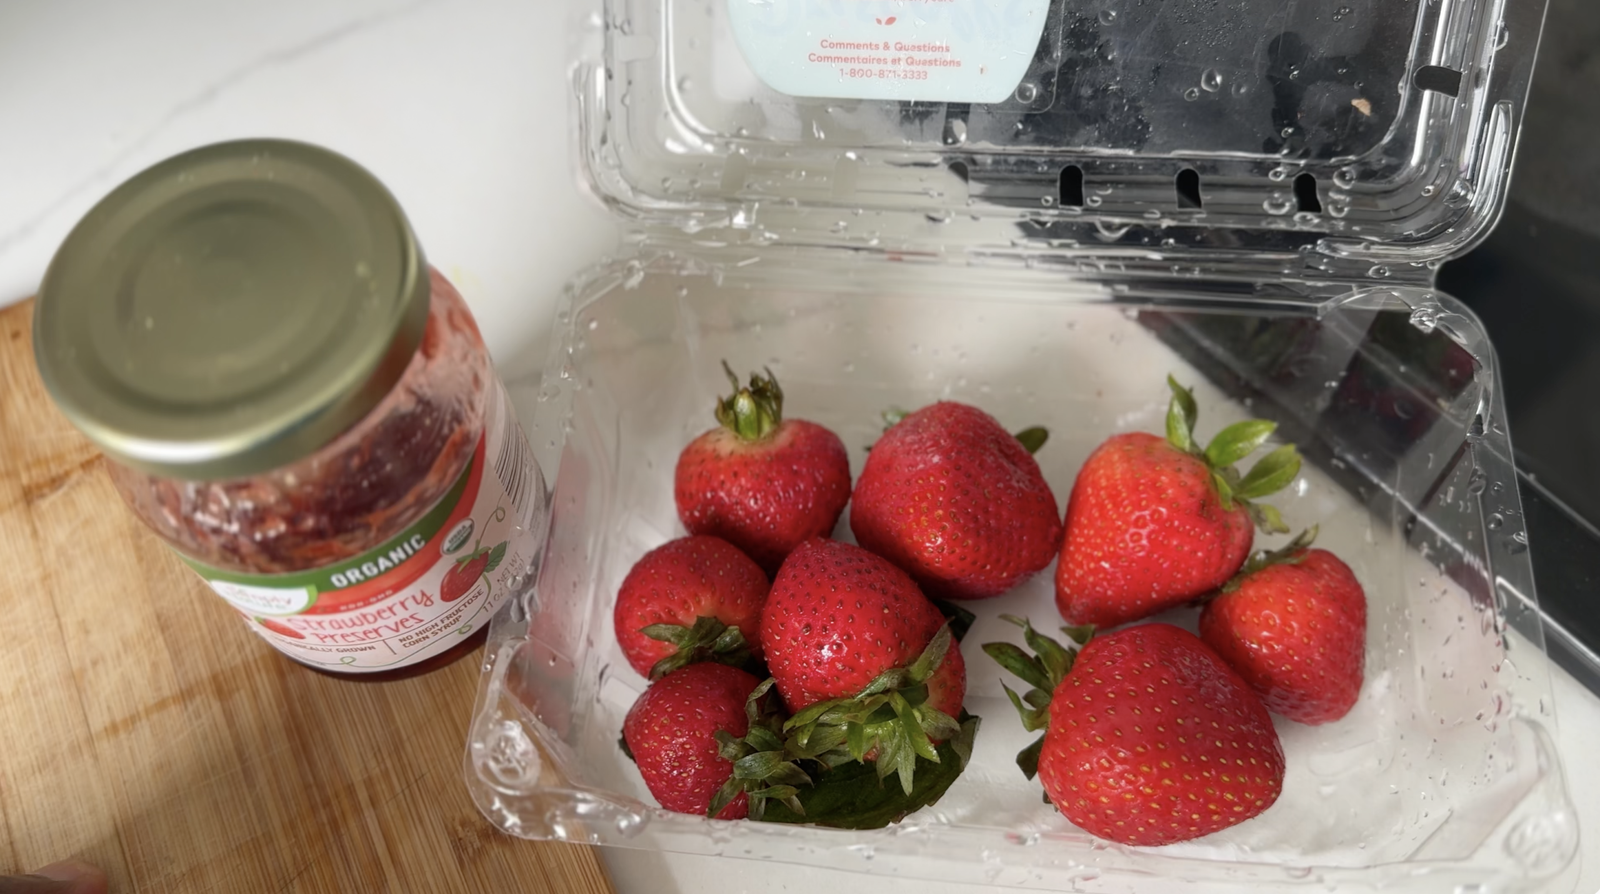
3. Strawberry Jam Kombucha
Strawberry kombucha can be tricky because fresh strawberries alone sometimes taste softer after fermentation.
That is why I like using fresh strawberries with a little strawberry jam.
The fresh strawberries give real fruit flavor, and the jam helps the strawberry come through more clearly. It also adds a little sugar, which can help with carbonation.
For each 16 ounce bottle, use:
2 tablespoons chopped strawberries
1 teaspoon strawberry jam
Plain finished kombucha to fill the bottle
Do not overdo the jam. A little is enough.
Too much jam can make the bottle build pressure quickly, so burp these bottles carefully.
This flavor is bright, fruity, and approachable. It is a great one for people who are newer to kombucha because the strawberry makes it feel familiar.
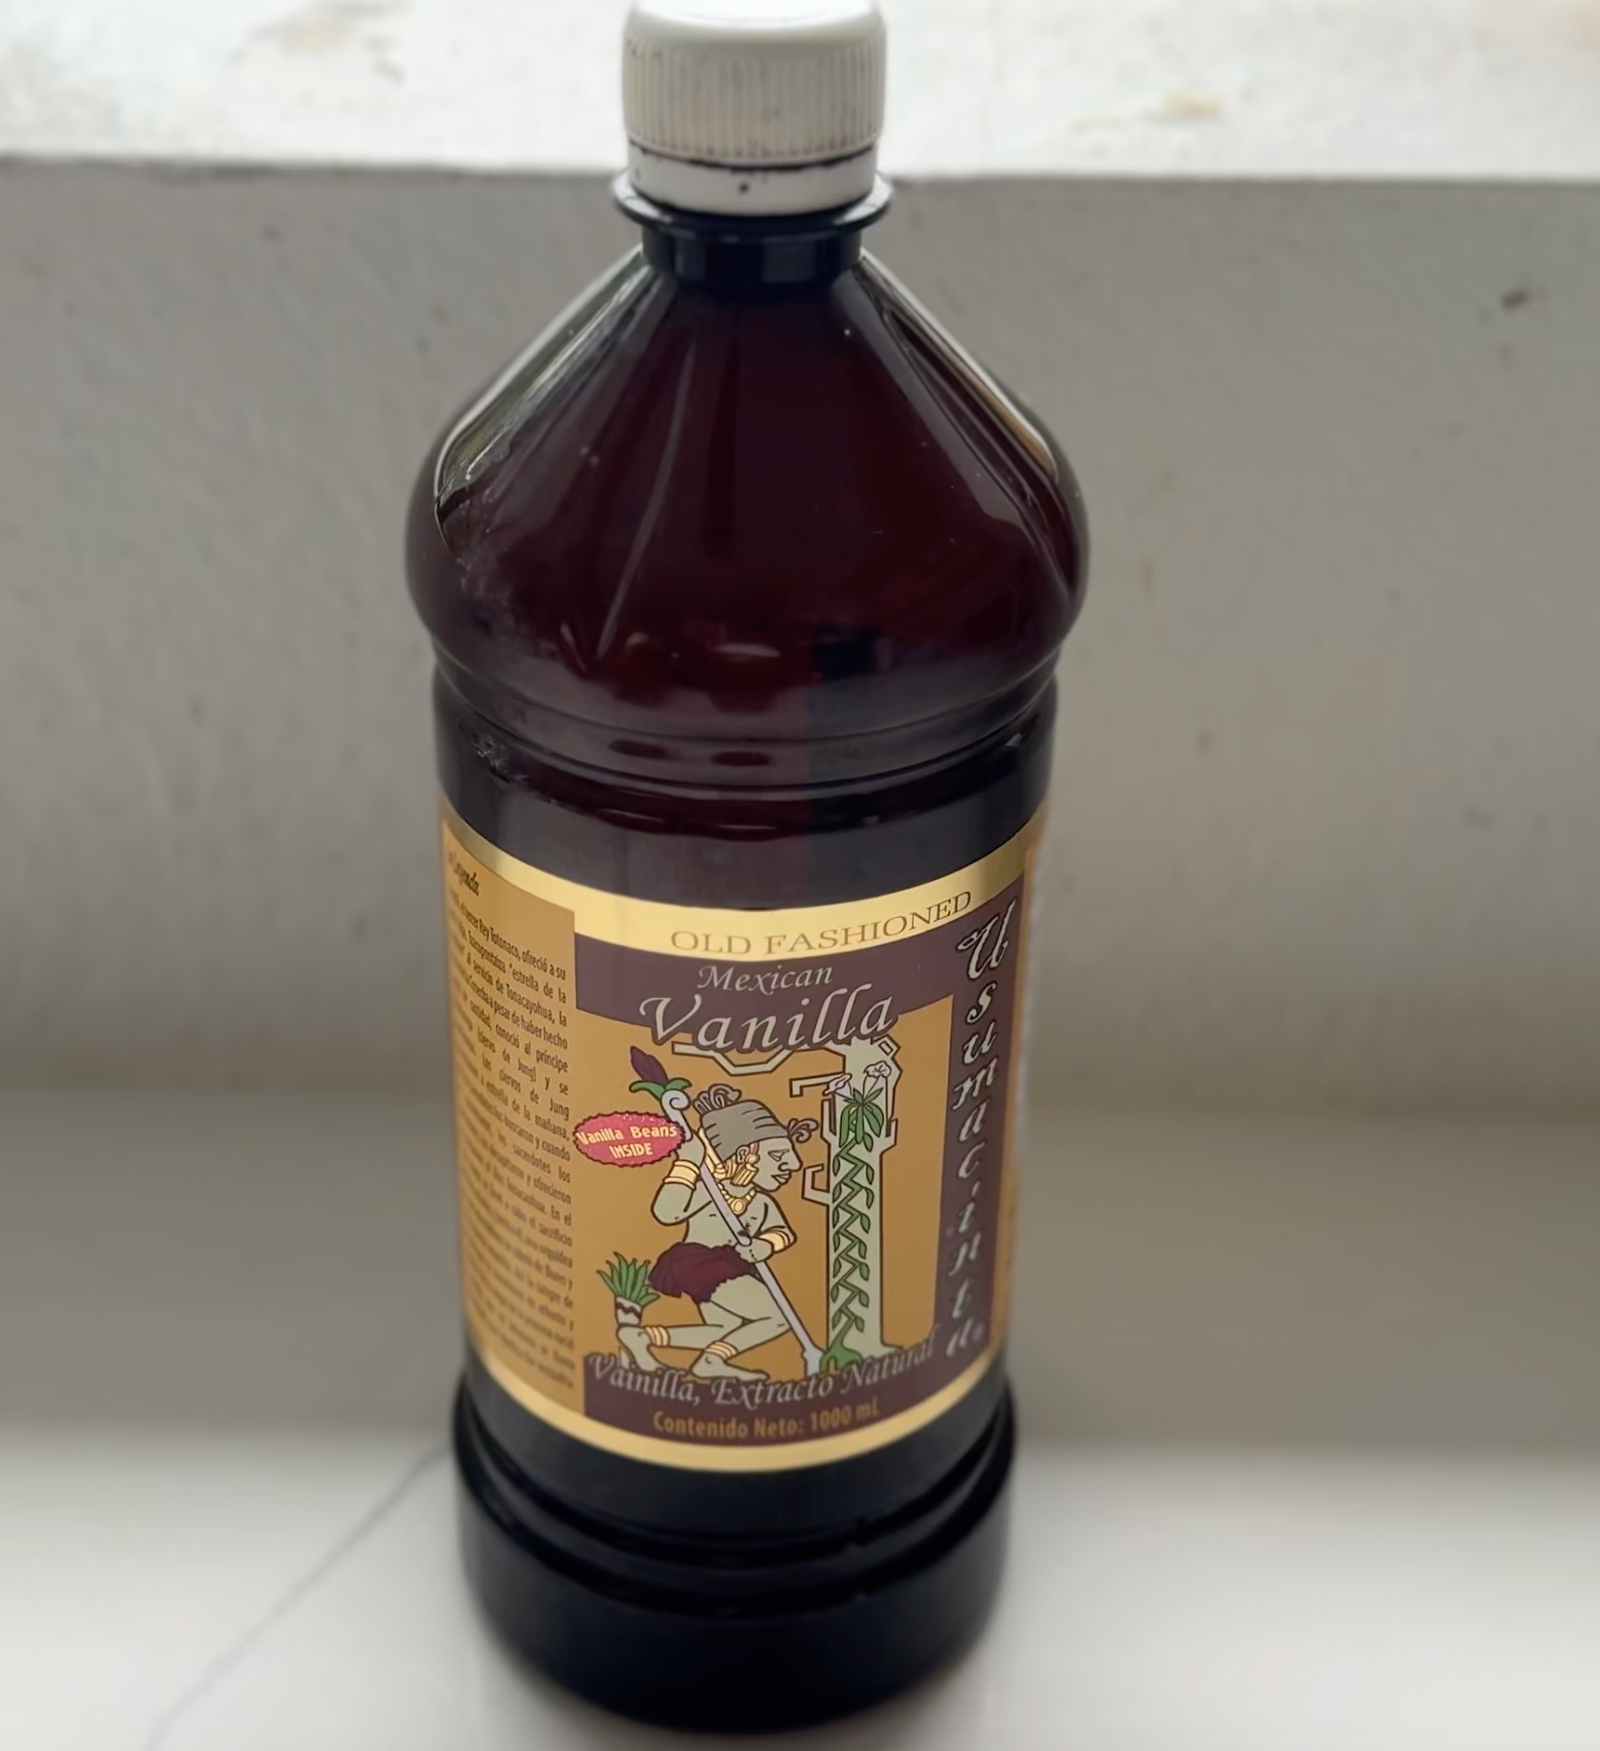
4. Vanilla Cream Soda Kombucha
This is the most surprising one.
Vanilla extract turns kombucha into something that tastes almost like cream soda. It is still tangy and fermented, but the vanilla rounds it out and gives it that nostalgic soda-shop flavor.
The key is using enough vanilla.
A tiny splash can disappear. Vanilla is one of those flavors that needs to be noticeable, or it does not really do its job.
For a full 1 gallon batch of bottled kombucha, use:
3 tablespoons vanilla extract
Plain finished kombucha
If bottling individually, use about:
1 teaspoon vanilla extract per 16 ounce bottle
Plain finished kombucha to fill the bottle
Add the vanilla directly to the bottle, then pour the kombucha over it. Seal and ferment for 2 to 4 days.
This one is simple because there is no fruit to chop and no straining needed. It is just vanilla and kombucha.
But the flavor is so good.
It gives you that cream soda feeling without making a heavy, syrupy drink.
A note about other kombucha flavors
Once you understand second fermentation, you can flavor kombucha in so many different ways.
You can try pineapple, mango, blueberry, citrus, mint, hibiscus, peach, apple, herbs, or different fruit juices.
But I do think it is worth saying that not every flavor is equally strong after fermentation.
Some delicate flavors get muted. Some fruits taste great fresh but do not taste as clear once fermented. Some combinations sound good but end up tasting vague.
That is why I like starting with flavors that have enough personality to come through.
Guava is tropical and fragrant.
Ginger is sharp and spicy.
Strawberry jam helps the berry flavor stay recognizable.
Vanilla extract gives a clear cream soda flavor.
Once you have those four down, then you can start experimenting.
Other flavor ideas to try
If you want to build from the four main flavors, try these:
Guava ginger kombucha
Strawberry vanilla kombucha
Strawberry ginger kombucha
Pineapple ginger kombucha
Mango ginger kombucha
Blueberry vanilla kombucha
Orange vanilla kombucha
Peach ginger kombucha
Hibiscus ginger kombucha
Think of these as variations, not the main event.
The four core flavors are guava, ginger, strawberry jam, and vanilla cream soda.
My basic second fermentation ratio
For each 16 ounce bottle, start with one of these:
2 to 3 tablespoons chopped fruit
or 1 teaspoon jam
or 3 to 5 slices fresh ginger
or 1 teaspoon vanilla extract
Then fill the bottle with finished plain kombucha, leaving about 1 to 1 ½ inches of headspace.
Seal, ferment at room temperature for 2 to 4 days, burp daily, then refrigerate.
That is the basic formula.
Tips for fizzy kombucha
Use strong starter tea for your first fermentation.
Let the first fermentation get tangy before bottling.
Stir the finished kombucha before bottling so the yeast is evenly distributed.
Use swing top bottles designed for fermentation.
Do not overfill the bottles.
Keep the bottles at room temperature during second fermentation.
Burp daily.
Refrigerate before opening.
Open slowly over the sink.
Fruit and jam can build pressure quickly, so be extra careful with the strawberry jam and guava bottles.
Why is my kombucha not fizzy?
If your kombucha is not fizzy, the most common reasons are:
The bottle did not seal tightly.
The room was too cold.
The first fermentation was too weak.
There was not enough sugar in the second fermentation.
The second fermentation needed more time.
The kombucha was strained too aggressively.
Try giving it another day or two at room temperature, or use a little more fruit or jam next time.
Ginger and strawberry jam are both good options if you want more reliable fizz.
Why is my kombucha too sour?
Kombucha gets more sour the longer it ferments.
If it tastes too vinegary, shorten the first fermentation next time. Start tasting around day 7 and bottle when it tastes tangy but still balanced.
Very sour kombucha can still be useful as starter tea for the next batch.
Can I use jam in kombucha?
Yes, jam works really well in second fermentation.
I especially like it with strawberry kombucha because fresh strawberries alone can be a little too soft after fermentation. The jam helps the strawberry flavor come through.
Use about 1 teaspoon jam per 16 ounce bottle.
Do not add too much because jam can build pressure quickly.
Can I use vanilla extract in kombucha?
Yes, vanilla extract works beautifully in kombucha.
For a cream soda style flavor, use about 3 tablespoons vanilla extract for a full gallon batch of bottled kombucha, or about 1 teaspoon per 16 ounce bottle.
This is one of my favorite second fermentation flavors because it is simple and surprisingly bold.
How long does second fermentation take?
Second fermentation usually takes 2 to 4 days at room temperature.
In a warm kitchen, it may happen faster.
In a cool kitchen, it may take longer.
Once the kombucha tastes fizzy and flavorful, move it to the refrigerator.
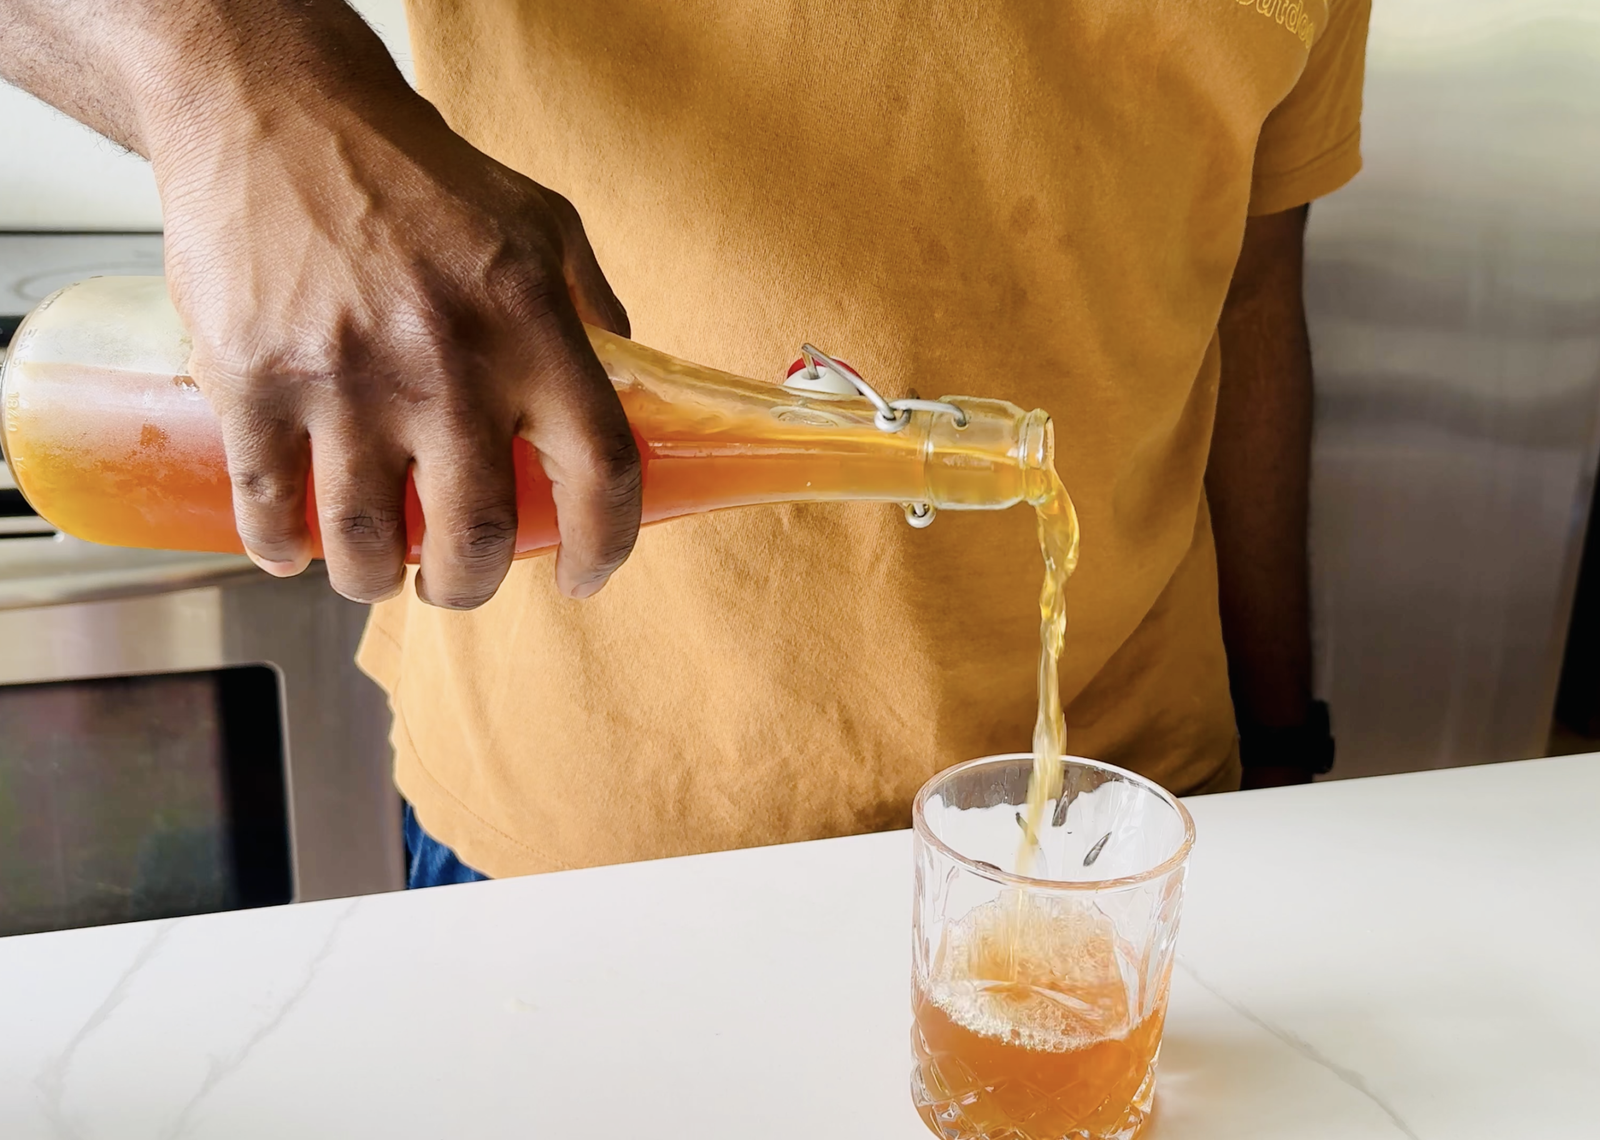
How to serve homemade kombucha
Serve homemade kombucha cold.
You can drink it straight from the bottle, pour it over ice, or strain it into a glass if you used chopped fruit.
For hosting, I love the idea of serving a few different flavors in small glasses. Guava, ginger, strawberry, and vanilla cream soda would make such a fun non alcoholic drink tasting.
It is the kind of thing that feels special without being complicated.
That is also why homemade kombucha fits so well into the way I think about hosting at home. A thoughtful drink can make a normal meal feel more memorable, and it is one of those little details people notice.
Final thoughts
Homemade kombucha is much easier than it seems once you understand the cycle.
You brew sweet tea.
You let it cool.
You add starter tea and a SCOBY.
You ferment it.
You save some for the next batch.
You bottle the rest with flavor.
Then you do it again.
The first fermentation gives you the base, but the second fermentation is where kombucha becomes fun.
And while there are endless flavors you can try, these are the four I keep coming back to because they actually taste like what they are supposed to taste like:
Fresh guava.
Fresh ginger.
Strawberry with a little strawberry jam.
Vanilla cream soda.
They are simple, bold, and delicious.
And once you have a few bottles chilling in the fridge, it feels like one more homemade staple that makes everyday life a little more flavorful.
For more of the staples I like to keep on hand, start with my Pantry Essentials List and the Pantry First Method.
Homemade Kombucha for Beginners with 4 Best Flavors
Equipment
- Large pot or kettle
- Clean spoon
- Clean bowl or jar for holding the SCOBY
Ingredients
For the first fermentation
- 14 cups filtered water
- 8 to 9 black tea bags or a mix of black and green tea
- 1 cup granulated sugar
- 2 cups plain kombucha starter tea from a previous batch
- 1 SCOBY
For guava kombucha, per 16 ounce bottle
- 2 to 3 tablespoons chopped ripe guava
- Plain finished kombucha to fill
For ginger kombucha, per 16 ounce bottle
- 3 to 5 thin slices fresh ginger
- Plain finished kombucha to fill
For strawberry jam kombucha, per 16 ounce bottle
- 2 tablespoons chopped strawberries
- 1 teaspoon strawberry jam
- Plain finished kombucha to fill
For vanilla cream soda kombucha, per 16 ounce bottle
- 1 teaspoon vanilla extract
- Plain finished kombucha to fill
For vanilla cream soda kombucha, full batch option
- 3 tablespoons vanilla extract
- Finished plain kombucha from one batch
Instructions
Make the sweet tea
- Add the filtered water to a large pot and bring it to a boil.
- Remove the pot from the heat. Add the tea bags and steep until the tea is strong, about 10 to 15 minutes.
- Remove the tea bags and stir in the sugar while the tea is still hot. Stir until the sugar is fully dissolved.
- Let the sweet tea cool completely to room temperature. Do not add the SCOBY while the tea is hot or warm.
Start the first fermentation
- Pour the cooled sweet tea into a clean glass fermentation jar.
- Add the starter tea and SCOBY.
- Cover the jar with a clean cloth, coffee filter, or tightly woven towel. Secure it with a rubber band.
- Let the kombucha ferment at warm room temperature, ideally around 70 to 80°F, out of direct sunlight.
- Begin tasting around day 7. The kombucha is ready when it tastes tangy, lightly sweet, and balanced. This usually takes 7 to 14 days.
Save starter for the next batch
- With clean hands or a clean utensil, remove the SCOBY and place it in a clean bowl or jar.
- Save 2 cups of plain kombucha from the batch. This will be the starter tea for your next batch.
- Use the remaining kombucha for second fermentation.
Bottle for second fermentation
- Gently stir the finished kombucha so the yeast is evenly distributed.
- Add your chosen flavoring to each clean swing top bottle.
- Pour the kombucha through a fine mesh sieve and funnel into each bottle, leaving 1 to 1 ½ inches of headspace.
- Seal the bottles and let them sit at room temperature for 2 to 4 days.
- Burp the bottles daily by opening them carefully over the sink to release pressure.
- Once the kombucha is fizzy and flavorful, refrigerate the bottles.
- Serve cold. Strain before drinking if you used chopped fruit and want a smoother drink.
Notes
Mold may look blue, green, gray, black, brown, or white and fuzzy. A healthy new SCOBY may look strange, but it should look wet, smooth, tan, cream colored, or jelly-like. Fruit and jam can build pressure quickly during second fermentation. Burp those bottles carefully every day.
The vanilla cream soda flavor needs enough vanilla to come through. Use 1 teaspoon vanilla extract per 16 ounce bottle, or 3 tablespoons for a full batch. Nutrition will vary depending on fermentation time, how much sugar remains, and which second fermentation flavor you use.

Comments
No Comments